Wednesday, 27 June 2012

Lesson 14: 21st Century Army

Modern Army
The pieces are all as normal. The only difference is they have guns and can shoot to kill pieces without moving. If a piece could be killed by the piece - then the piece kills it...without moving onto that square!

Secret Agent
If the King is in check, it must switch places with a predesignated secret agent pawn (if still alive).


Suicide Bomber!
The idea is that you secretly pick one of your pieces at the beginning of the game to have a bomb. To self-detonate it must be your turn and you must not have moved the piece - i.e. the pieces move is to explode itself - so it cannot move somewhere and then blow up at the end of its go and equally it cannot simply blow up when it is being killed during your opponent's turn. - the suicide bomber (which ends its turn) and kills itself- as well as any pieces in a 1 square radius - i.e. a 3x3 grid surrounding the piece. To make the game slightly easier - you could allow more then one suicide bomber or - for more of a challenge - only allow higher pieces to be bombers (pieces other than pawns).  There is also the obvious choice of making the suicide bomber a random piece by selecting the piece using a deck of cards (King=King, Queen=Queen, Jack=Bishop, 10=Rook/Castle, 9=Knight/Horse, 8-1 = 8th-1st pawns)

Lesson 15: 4-Player Chess

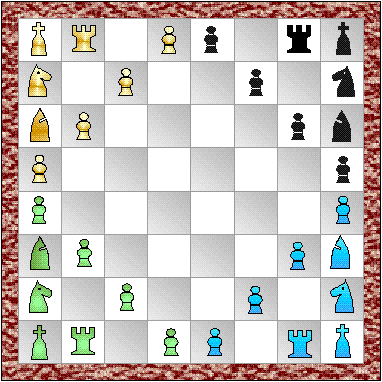
This is a chess variant known as BastardO: its great for four players on the same board. Set up is like so:
This is great. Pieces all move the same as normal. There are some slight rule additions:
  • All 4 players take in in turn to move and all are against all (unless players agree to make alliances - although these are not RULES so much as negotiations and can easily be betrayed - hence the name of the game) and If you kill an enemy king then they are out, and you take control of their army! Winner is the last in the game. 
  • You do NOT have to declare CHECK - but of course another player may wish to! hehe - this is where the cursing begins
  • The top two teams move down the board and the bottom two teams move up the board. 
  • En passant is as before - except any pawn may do this (not simply the one facing the enemy pawn) and as before it would go into the square the killed pawn would have moved into had it moved one square instead of two (on its first go - refer back to the rule of en passant if you have forgotten how )
  • Pawn promotions still apply - although the only piece it can be promoted to is a SPECIAL piece that moves like a queen and a knight combined (the only useful piece in such a game).
  • Castling is not allowed in this variant
  • A person may choose NOT to move on their turn
There is a variant to this variant called GRAN BASTARDO - in which the initial setup is random. Each player takes it in turn to lay down each piece anywhere on the board they wish. The only exception is that pawns can not be on a square that gets them immediately promoted, and you may not place a piece where it checks a king during setup.

Tuesday, 26 June 2012

Lesson 17: Tactics

"All warfare is based on deception. Hence, when we are able to attack, we must seem unable; when using our forces, we must appear inactive; when we are near, we must make the enemy believe we are far away; when far away, we must make him believe we are near."

 Tactics are all about multiple stage attacks - an attack which takes more than one move to complete and which anticipates the opponents move. (This means you will need to start thinking a few steps ahead. Start small: just picture what your enemy will do. Then increase this by thinking what you would do if they did that. And then what they would do to that. The more steps you can think ahead the better).

The golden rule for tactics are this: Don't be too hasty to Take easy kills. Firstly, it may be a poisoned pawn (a trap tactic) which you will learn about shortly. Secondly, even if it is not a trap, it is far better to anticipate what your enemy will do after you make that attack and then put other pieces into position first to counter those moves before you make the attack - thus - the attack will cause greater devastation! This is where tactics come in -  "When you see a good move, wait – look for a better one" 
     
    Here are some well-known Tactics to try (treat each tactic as a separate lesson - do not advance to the next until you have managed to use the tactic in a game. as a hint, the minimum number of steps ahead you will have to visualise to use the following tactics are written in brackets beside it)

    MANIPULATING ENEMY MOVEMENTS 
    • (passive) Quiet Move  = (+2steps+) This is where you move your piece into a position that neither kills nor threatens the enemy but limits the manouverability of one of the enemy pieces by occupying a square (perhaps your piece is protected and cannot be taken). This is useful for limiting the enemies options.
    • (passive) Attraction/Clearance = (+2steps+) A bait/trap to lure a piece onto (attraction) or off of (clearance) a specific square! This is usually done by offering a piece to be sacrificed onto that square. This works best where the piece you wish to lure has no option but to kill the "sacrificial" piece - (i.e. if it doesnt the sacrificial piece may kill it anyway)
    • (aggressive) Coercion = (+2steps+) This is where you lure an enemy piece onto a square without using a sacrifice but by threatening them and limiting their escape routes to the square you want them to go onto.

    TRAPPING ENEMY MOVEMENT (& CHECKMATES)
    • Pinning = (+2steps+) In order to keep a piece where it is, it must be inbetween your attacking piece and a more valuable piece of it (often the King), so that it cannot move without exposing its own King to attack. This piece is now unable to move or kill until your attacking piece or the piece its pinned to is moved (if it does - it exposes the piece behind it to danger - This is called Skewing.). The best way out of a pin is to kill the threatening piece that is doing the pinning.
    • Blocking = (+3steps+) When you see an opportunity to threaten a piece- you can turn it into a kill by blocking the escape route of the piece first. The way to block the escaperoutes is to manipulate the enemy's own piece to be in the way. E.g.1 where the enemy piece is trapped behind the first row of his pawns and a rook or queen is threatening down the back rank (Backrank mate if donw on the King). E.g.2. where the enemy piece is COMPLETELY surrounded by his own pieces and cannot escape is called Smothering. The deadly kill would come from a knight in this situation.
    • Trapping = This is where you attack a piece from multiple angles - and since it could get killed in more than one way on its next move it is far more difficult to foil the attack.

    COMBINATION ATTACKS
      • (passive) Concentration of Superior Force = This is similar to a trapped piece where you have multiple pieces attacking a single enemy piece, except this time the enemy also has multiple pieces defending it. This move will only work if you have at least one extra attacking piece than they have defending - then when you go into war and pieces are killed back and forth - you will eventually come out winning the exchange - by killing one more piece than was killed! (Battery attacks are similar to this, except done in 1dimension/1file/rank/diagonal - whereas this attack may be done in 2d/from multiple directions).
      • (aggressive) Reduction = This is probably the easiest tactic and should only ever be done if you are ahead in material. It is killing off enemy pieces even though your attacking piece will get killed in return. You should ideally rid pieces of equal or higher value (i.e. your bishop kills the enemy bishop - and then your bishop is killed by the defending knight). The reason for such a seemingly pointless move is clarity. With less pieces on the board - the possibilities are drastically reduced (which usually favour the one being defeated). This way - you still have a superior reduced army, except now you have eliminated many possibilities your opponent could have used to gain the upper hand. 

      • (passive) Discovered Attack = (+3steps+) This is where you have a piece lined up to kill something but there is another piece blocking the way - so in order to complete the attack you first move the other piece out of the way - either by manipulating / attracting it away OR if it is your own then simply moving it out of the way.
      • (aggressive) Surprise attack = (+3steps+) This is identical to the discovered attack except the piece that moves out of the way to discover the attacking piece behind, is also an attacking piece! OR if it is your own piece then to use it to attack something else so as to disguise your true attack and For instance, if your piece is hiding an attacking piece behind it and when it moves out of the way the piece behind can kill - but instead of simply moving out of the way - it also threatens another piece so as to disguise the attacking piece it was hiding and making it all the more of a surprise as, unless the player is very aware, they will not realise they are under threat from that piece until it is too late - a surprise attack!   
      • (passive) Overburdened Pieces = (+3steps+) If you spot a backup piece that is defending more than one piece - it is overburdened as realistically it can only defend one of those pieces - you can take advantage of this by sacrificing a piece of yours to kill one of those pieces being protected and as the overburdened backup piece will respond to it and take your piece, it will leave its other piece unprotected and ready for the plucking. 
      • (aggressive) Fork =(+3step+) This is where your piece is threatening to kill more than one enemy piece at the same time! in this case, the enemy cant defend all at once in one move so they save their most valuable and you can kill any of the others
      •  
         
      • (passive) Interference = (+3steps+) This is where your piece moves in the path of a backup piece rendering its ability to backup the other piece blocked, and hence the other piece becomes vulnerable for the attack. This works best if the interfering piece is made to be the enemies own piece OR a piece of yours that is threatening another piece in such a way it cannot be ignored
      • (passive) Distraction = (+3steps+) This is a tactic to move a backup piece away in order to kill your main target. The best way to do this is to lure it away using a bait/sacrifice. With the backup piece distracting and away from its post - you can go in for the main kill!
      • (aggressive) Capturing Defender = (+3steps+) THis is simply killing the enemies defending piece before making your main attack on your target. If you didnt do this and simply went ahead with the attack on the target, the defending piece would end up killing you - so this step is simply an intermediate step to remove the backup before going in for the kill. 

      RESPONDING TO THREATS OF ATTACK:
      • (aggressive) Counter-Attack=  Ignore the immediate threat to the piece by threatening to kill an enemy piece of equal or higher value. This should force your opponent to consider saving their piece and shift the focus away from the attack on your piece.
      • (passive) Retreat = This should be a last resort - as usually pieces that are being forced to move or retreat are being set up into an attack! However, when moving out of harms way it should always be done to improve your overall position on the board where possible - for example you may be able to threaten or even kill another piece with that moving piece. It is important to not simply move anywhere but into the best position for the next move or at least in a defensive position where you cannot be threatened again next move. Do this ONLY if you cannot save the piece using one of the other tactics and you really do not want to lose your piece.
       
      • (passive) Sacrifice = There are times when leaving your piece to be killed is the best move - such as if there is nothing you can do to save it or if you need to clear some space or use it as a distraction. Instead of waste a go trying to defend a wasted cause you could spend that go on another attack in which you win back the material or more.
      • (aggressive) Desperado = (+1step+) This is where one of your pieces will get taken the next go no matter what you do - and so you use it to kill a piece you wouldnt have otherwise since it would have been killed in return (in this case it doesnt matter as it would have been killed anyway)   

      • (passive) Defensive Move = (+1step+) This is placing a piece to backup a piece of yours that is under threat of attack! You can build up multiple pieces to defend your piece if there are multiple threats coming your way.
      • (aggressive) Zwichenzug = (+3steps+) This is a move you can make if you see the next move about to cause imminent distruction on one of your pieces and you have no way to save it - you could make another completely unrelated attack of your own on a piece so valuable that the enemy can not ignore it and has to respond to it (such as a check or a threat to the queen)which would succeed in buying you one extra turn. This is useless, however, unless this extra bit of movement now puts you in a better position to defend the oncoming onslaught than before. If not - its just plain stalling!

      Practice: Try these exercises: http://www.chess-strategies-tactics.com/chess-tactics/chess-tactics-training/chess-tactics-exercises
      Then Practice in games -since the best time to use tactics are after the opening - so if you want to practice quickly without having to go through an opening - play chess960 - its a form of random start and so the action is immediate

      Thursday, 21 June 2012

      Lesson 16: Opening

      strategy - building up a formation and structure in your army.
      Golden Rules (in order of importance)
      1. Make sure ALL your key pieces are defended by a backup piece (e.g. bishops defended by knights), even when they are not being threatened (as this saves time when they do begin to be threatened and builds up a strong structure). if possible avoid having a backup piece defend two pieces at once
      2. Immediately neutralise any pieces that come onto your side of the board by chasing it or exchanging it.
      3. Simplify when ahead in material or when faced with a spacial disadvantage
      • TEMPO: 
        • Develop using threats of attack (do multiple things at once)
        • in the beginning, avoid move the same piece twice.
      • POSITIONS:
        • Try to maintain at least one pawn in the center.
        • Keep knights off the end files and onto good outposts. 
        • keep pawns from blocking your bishops - if they do then trade them off.
      • PAWNS: Open with a center pawn & Make as few pawn moves as possible  (and every time you do make sure the pawn structure remains strong -Remember, pawn structures are key as they can not go back).
      • KNIGHTS: develop before bishops
      • BISHOPS: better than Knights in Open games but Knights are better than Bishops in Closed games (use and trade off as appropriate)
      • QUEEN: Do not bring your Queen out too early in the game (It should be one of the last pieces to be developed)!
      • KING: should Castle as soon as possible, preferably to the King side - this will provide King Safety until the end game where the King comes out to do the fighting.
      • ROOK: one should be free to defend the BACK Rank as soon as all other pieces are now developed and the King is castled in the corner. Place your other rooks either in an open file where there is a hole created by the enemies pawn structure and nothing behind it - ready to penetrate behind enemy lines, OR behind an advancing pawn, be it your own or an enemies, in order to protect your advancing pawns or prevent your enemies pawns advancing

      Saturday, 19 May 2012

      Lesson 13: Halloween Army


      Plague
      A piece is picked randomly using cards or secretly by yourself to be plagued. When  apiece kills it - it is also killed too.


      Zombie
      The idea here is that a killed piece turns into a zombie (of the same piece type - ie - a killed bishop becomes a zombie bishop). Zombie pieces can not be killed by normal pieces and normal pieces also cannot jump over zombies. Similarly - zombies cannot jump over anything and cannot kill normal pieces. They are a bit like dead weight and clutter on the board - however, if you have more than one zombie piece - you can use one to kill another one of your zombies - which actually reincarnates it as a normal piece again!!(alternatively you could think of ZOMBIES as "Captured" pieces  - - so rather than any piece being "killed" they are "captured" - ready to be freed by a fellow captor).  NOTE: The zombie piece is placed on the square the normal piece was captured as soon as the capturing piece leaves on their next turn.  Similarly, the reincarnated piece is placed on the same square the zombie was captured when the capturing zombie leaves the square.

      Cowardly King
      This is where your King is not really the King and if it is killed or checked it will not matter - the game will go on. Your true king is masquerading as another piece. Or, put another way, one of your other pieces is the King, although it moves as normal, if it is killed then you lose the game!! Yes - your king may even be a pAWN! -- you cannot choose who your King hides as - or it may start to be predictable after you keep choosing the QUeen! It is chosen at random. You may do this by picking a card at random. King=King (yes - it may simply be the correct piece), Queen=QUeen, Jack=Bishop, 10=Rook/Castle, 9=Knight/Horse, 8=eighth pawn, 7=7th pawn, 6=6th pawn, 5=5th pawn, 4=4th pawn, 3=3rd pawn, 2=2nd pawn, Ace=1st pawn - Players should keep their cards till the end so that when the game is over they can verify they did not cheat and change which piece was king half way through.

      Lesson 12: Mini Chess

      (Single Player) - The Queen's Dinner Party
      This game is played on a 4x4 board (use a quarter of a normal board).  It is not a battle but a peaceful dinner party with laughing and dancing - and so no attacking or killing takes place..only dancing (moving)!  All pieces (except pawns as they are not invited) from both armies are placed randomly onto the 4x4 board (except the other Queen who does not arrive as she did not want to come to her rival's party).  This leaves one empty square in the 4x4 board.

      The aim of the game is to get the one Queen to the edge of the board...without killing anyone!

      (Two Player) - Baby Chess
      The board is a 5x5 grid - using about half the size of a normal army. Pawns at front as per usual and back row is set up as shown. All other rules apply. This game is good for a quick battle or skirmish.

      Lesson 18: Visualisation Training

      There is a really simple way to improve your visualisation skills fast. Play imaginary chess.
      1) Start by doing some simple visualisation exercises like i) visualising one or two plus pieces on given squares and say the colour of that square then ii) visualise pawns on given squares and saying if they can move to the next said square and iii) visualising a bishop on a square and saying if it can move to the next squares said then iv) place a knight on a square and say if it can move to a said square in one move and then v) the same but if it could reach there in 2 moves.
      2) Then move onto simple chess puzzles. i) Start by visualising setups with 1 white rook and king vs 1 black king.  ii) then 1 white rook and king vs 1 black pawn and king, iii) then 1 white rook, bishop and king vs 1 black pawn and king iv) then 1 white rook, knight and king vs 1 black pawn and king. v) Then finally moving multiple pieces to solve an end game puzzle in a few moves (you can use the puzzles at the bottom of this blog).
      3)Then move onto playing Alice in Wonderland Chess (explained below) which forces you to visualise missing pieces.
      4) Then play normal chess but have one side as real pieces and the other as imaginary pieces.
      5) then eventually progress to both sides being imaginary and finally do this completely in your mind - without a board

      ALICE CHESS
      This requires two boards as opposed to only one!
       Game play is as normal - except at the end of each pieces move - it goes through the looking glass and gets transported to the exact same spot onto the alternate reality chess board (the second chess board) and there it remains until it makes another move, at the end of which it gets transported back through the looking glass into normal reality again (the first board!) - - it gets very difficult to keep track

      The main thing to remember is that you can only move to a square if you are able to transport though it at the end of the go - if there is a piece occupying the square on the other board (blocking your ability to transport to it) you cannot move there! - - You only 'kill' pieces on your side of the looking glass (on your board) and cannot kill the alternate reality piece (i.e. cannot transport through to the otherside at the end and then kill the piece you land on!)..

      this means you can keep your king safe by moving him through the looking glass onto the other board! it also means that it is a lot harder to check the King as you must move into position on the other board so that you transport into the position of check (otherwise if you attempt to check him on the same board - you will simply transport to the alternate board at the end of your move and so the King will not be in check - you can not check THROUGH the looking glass!!) 

      WHAT IF I DON'T HAVE TWO CHESS BOARDS!!
      If you dont have two chess boards - then this game can be modified slightly to be played on two halves of one board - imagining a giant mirror inbetween the two halves of the chess board!

      Of course - this means there is less space to set up your army (4 squares wide as opposed to 8 squares) -
      so to compensate each army will start in THREE rows instead of the usual two -
      the front row will consist of 4 pawns (not 8), the second row will have your semi-precious pieces: knights on the outside and bishops in the middle, and the back row will have your rooks on the outside protecting the King and queen on the inside. - Remember - at the end of each move - the piece is transported to the same spot on the alternate side of the board! enjoy

      PRACTICE: 1) play alice chess - both armies starting in normal reality (same board).  2) play alice chess - one army starting in alternate reality / wonderland (one army starts on the second board). 3) play alice chess with a third chess board - so there are three possible worlds - and you have the option of which board you teleport to!